.jpeg?width=300&name=AdobeStock_600514495%20(1).jpeg)
There is now a way to add a PowerBI Report to Power Apps model-driven Apps and have it filter based on a specific record within the model-driven app.
Microsoft learn has good documentation on how to set this up, so this blog will focus specifically on the last couple steps in the process that applies the contextual filtering to add the model-driven app data to the PowerBI Report.
Before starting, make sure the following prerequisites are met:
- The PowerBI report that will be used exists and its data is able to be viewed
- A solution is set up to make the modifications in the form and the powerbi report is added to that solution
- All users viewing the report will need a PowerBI pro license
- PowerBI Extensions installed in the environment(s) where this will be used
Step 1: Starting up
Once the prerequisites are met and the PowerBI extension is installed, go in and edit the specific model-driven app form that the PowerBI report will be added to (currently only main forms can be used). There should be a PowerBI section in the Components menu available.

Step 2: Getting details
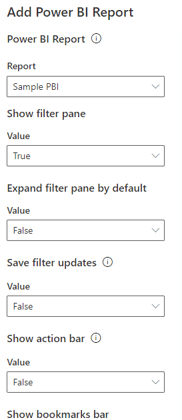
Depending on the size / content of the PowerBI Report, add it to either a section in the form or add a tab and place the PowerBI report in the new tab. You will be prompted to fill out the PowerBI details.
Note: if you do not see the report, make sure the report is added to the current solution first. Most of the selections affect which PowerBI features should be available within the embedded report and will be based on design preferences.
Step 3: The fun part!
Filling out the JSON filter string.
This can be overwhelming at first, especially for those who don’t have extensive JSON knowledge/experience. From the documentation, the format is as follows:

Again, can look a bit complicated at first, but keep in mind there are only a couple of areas to modify.
Let's quickly review a couple of JSON basics -
- First: The overall JSON format for any object is
[{“Property Name”:”Property Value”}] where the square brackets, [], can represent an array or table and the {} can represent a series of related properties (i.e. a row in a table). If you picture a table containing the name and age of a person, the following JSON string describes two people in that table:
[{“name”:”Jon Doe”, “Age”:35},{“name”:”Jane Smith”, “Age”:32}]
The square brackets encase the entire table and the curly brackets encase each row. So Jon is 35 and Jane Is 32. - Second: The JSON escape sequence. There are actually several different sequences out there to use, but this application only referes to one: \”.
This escape sequence separates the manual entries with the dynamic ones and allows the model-driven app data to be inserted into the PowerBI report.
Now, taking the two basics above, if you remove the escape sequence from the original filter criteria you get something a little bit more readable:

Notice that the Filter area had the escape sequences and not the Alias area. Also, the values property in the Filter area does not have quotes, this is meant for non-text values. Quotes/escape sequences are needed for text-type values now to put the filter all together.
Let’s go back and start with the filter string from the Microsoft Documentation and add in our PowerBI tables and Model-Driven app data.
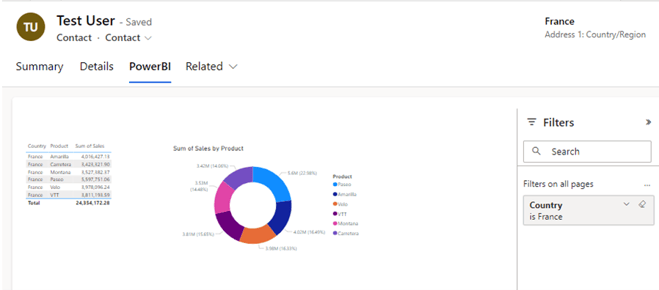
In this example, the PowerBI report will filter the Country field in the financials table with the Address 1: Country/Region value in the Model-driven app. Since this is a single field filter, the values section of the filter string is simplified from [$a, $b] to just [$a] -
{"Filter":
"[{\"$schema\":\"basic\",\"target\":{\"table\":\"financials\",\"column\":\"Country\"},\"operator\":\"In\",\"values\":[\"$a\"],\"filterType\":1}]","Alias": {"$a": "address1_country"}}
It should look like this ->
-1.png?width=787&height=102&name=Picture%20(1)-1.png)
If done correctly, you should see the filter in the PowerBI report, but showing it filtered to blank. If you do not see something similar in the filter, check to make sure your filter string does not have line breaks in it and double check the table and field names.
.png?width=239&height=276&name=MicrosoftTeams-image%20(75).png)
Step 4: Save + publish
Once the filter looks similar to the previous image, save and publish the form. then check it in the model app against live data to make sure it works properly.
Step 5: Important notes
After getting the report setup properly there is something significant to note for this setup. A copy of the PowerBI report is created and placed into the current solution. Any future updates to the PowerBI report need to be applied to the solution copy. If the report is only used within the Model-driven app, great, the solution copy becomes the main file. But in many cases, the PowerBI report is initially created and used elsewhere so now two copies need to be maintained. This can be cumbersome, especially when the PowerBI developer and the Model Driven app developer are not the same. It can also be a good thing to separate the model driven app version to maintain version control and ensure that filter you worked hard to implement doesn’t break.
The new feature of connecting Model-driven data to PowerBI reports is a nice way to quickly view the information you want by automatically applying the correct filters based on where you are in the model-driven app.
Since this is a relatively new feature / niche application, there aren’t too many working examples out there so hopefully this post helps clarify the more complicated steps on implementing.
Interested in learning more from Aerie? Let's talk!
Share