

SharePoint Framework is the new development model proposed by Microsoft to build webparts in modern SharePoint. One question I see alot is, "What about SharePoint Add-Ins? Are they gone?".
For those of you who do not know what a SharePoint Add-In is...it was a new development model for SharePoint 2013 which was meant to replace farm solutions within SharePoint. You can find more information about the SharePoint Add-In Model here (used to be called "SharePoint App Model".
- http://www.aerieconsulting.com/blog/sharepoint-app-model-part-1
- http://www.aerieconsulting.com/blog/sharepoint-app-model-part-2
- http://www.aerieconsulting.com/blog/sharepoint-app-model-part-part-3
The SharePoint Add-In model was a way to build SPAs or WebParts in SharePoint, especially SharePoint Online where farm solutions are no longer available. Provider-hosted add-ins allowed developers to build web applications which could leverage on-premise data and surface them within SharePoint by registering a client key/secret.
The downsides to SharePoint Add-Ins were that the client secret expired every 2 years and your application would stop working within your SharePoint envrionments until it was renewed, and is a bit of pain to renew the secret. The biggest pain however, was that if you were to build a webpart using the add-in model, it was very hard to style because it was leveraged by using an Iframe.
In the modern SharePoint world, we are replacing this old development model by building 100% client side webparts. In this blog post, I am going to show you how to leverage WebAPIs registered in Azure AD to bring content reliably and securely to SharePoint Online.
In the past, farm solutions and provider-hosted add-ins were the standard for getting on-premise content into your SharePoint environment. Well, it's 2017 and it's time to think about things differently. This tutorial is going to show you how to use the Adal.js library to call an on-premise WebAPI that is secured by Azure AD. Let's get started.
Create a WebAPI
I am going to create a standard WebAPI project using Visual Studio.
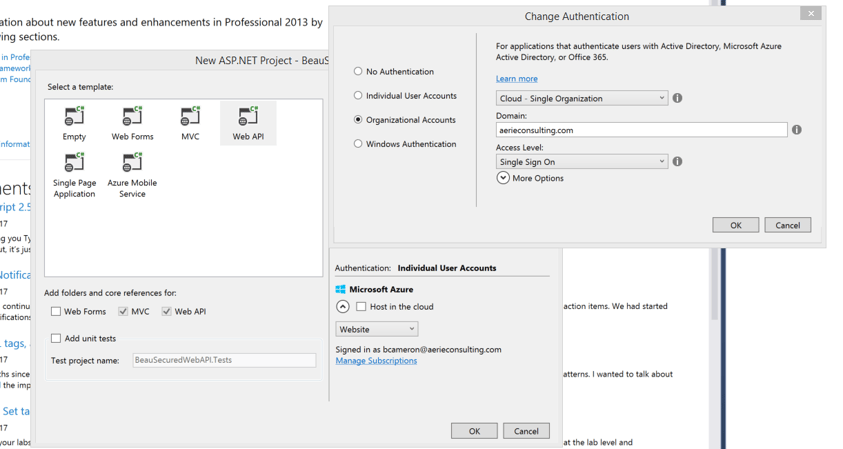
Before skipping to the next step, please notice that I am changing the "authentication" (right side) of the application to use my company domain, by selected "organizational accounts". In the past, when we were to secure web applications, we would download OWIN from Nuget and configure authentication within the application. By changing the authentication here to use Organizational Accounts, Visual Studio is automatically going to install OWIN components and even configure the auth for me. Let's see what the looks like.
Install Authentication components
In your solution, there will be a bunch of new configuration code built in. The solution now contains a Startup.cs, Startup.Auth.cs and even modifications to the web.config file.
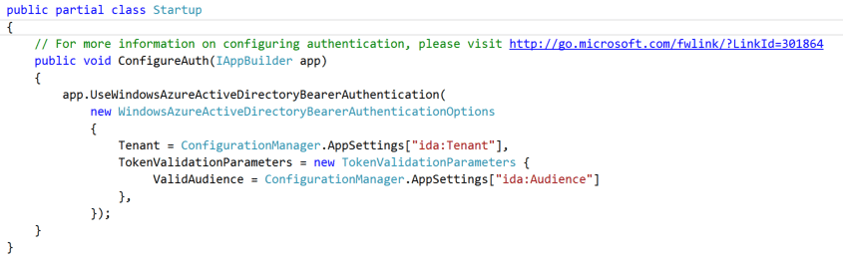
Inside Startup.Auth.cs, you'll see one function which tells our WebAPI to use Windows Azure AD Bearer Authentication. What this means is that, in order for us to hit the API we will have to pass a Bearer token through the request header.
You'll also notice the function is grabbing values from your web.config, more specifically "Tenant" and "Audience". If you open up your web.config you'll see values were added specifically for authentication. Tenant refers to my AD Domain, Audience is the AppURI for a newly registered application in Azure AD(show that later). ClientID and Password are generated for us, which map to that same application in Azure AD.

Before we go any further, let's test to make sure that our WebAPI is actually secured by Azure AD. I am going to launch debug my application and hit the default Values controller. You should recieve an error like so...
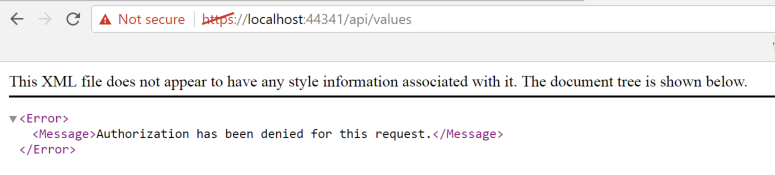
Success! We have been given a 401 because we haven't passed a Bearer token to this call to get the items. The reason for this is because, as part of the authentication configuration that Visual Studio did for you, it also decorated your controller by default with the [Authorize] attribute like so:
![]()
Just like any other attribute in MVC/WebAPI, this attribute can be used to secure controllers or individual actions within your WebAPI by Azure AD. This is fantastic and up until this point, was very easy because Visual Studio did all of the work for us. Let's go check out the Azure Portal to see what happened up there.
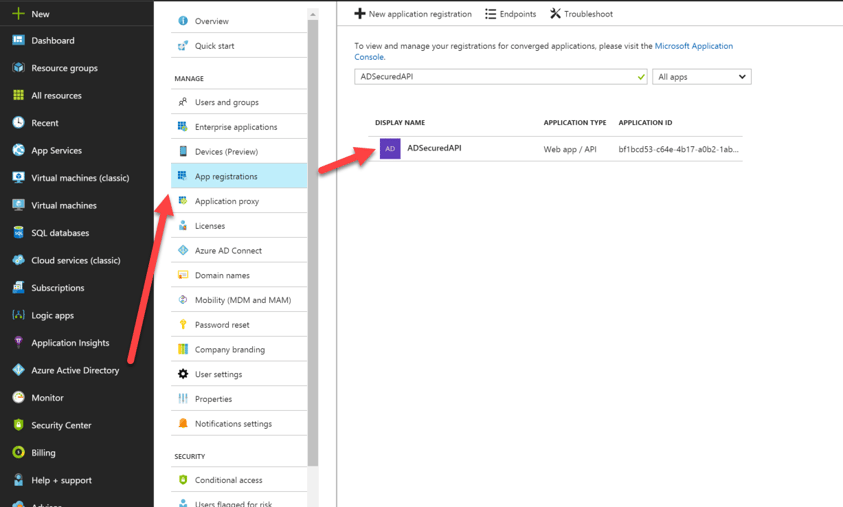
Navigate to https://portal.azure.com/
Open up your Azure Active Directory from the left menu and select "App Registrations" and my app by the APPURI, in my case it was "ADSecuredAPI".
Once you select your API, you'll be brought to the settings of the application. At this point, there isn't much know except understanding that Visual Studio registered this application for us within Azure AD. If you wanted to add authentication to an existing WebAPI or application that you wanted to secure, you would have registered this application manually.
In this tutorial, we are going to be executing code from another server. In our case, we will be executing an AJAX call to this new API from Office 365. In order to allow this to happen, we also must register Office365 in your Azure AD as well. Understand, this scenario has to be completed for any application executing a request against our on-premise WebAPI, whether it be Office365 or another client application.
To register Office 365, I am going to go back to my App Registration and choose "+ New application registration".
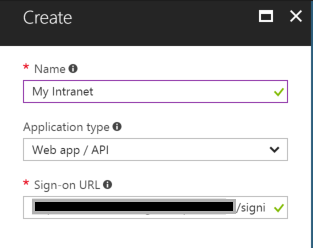
You can name this whatever you'd like, I am going to name mine "My Intranet". The sign-on URL is the URL of your Office365 site followed by /signin. Voila! Our SharePoint Online environment is configured in Azure AD and all we have to do is grant permissions for it to access our WebAPI.
- Under settings, navigate to "Required Permissions"
- Click Add, Select our WebAPI we registered previously, click 'select'
- Check 'Access ADSecuredAPI (your api)
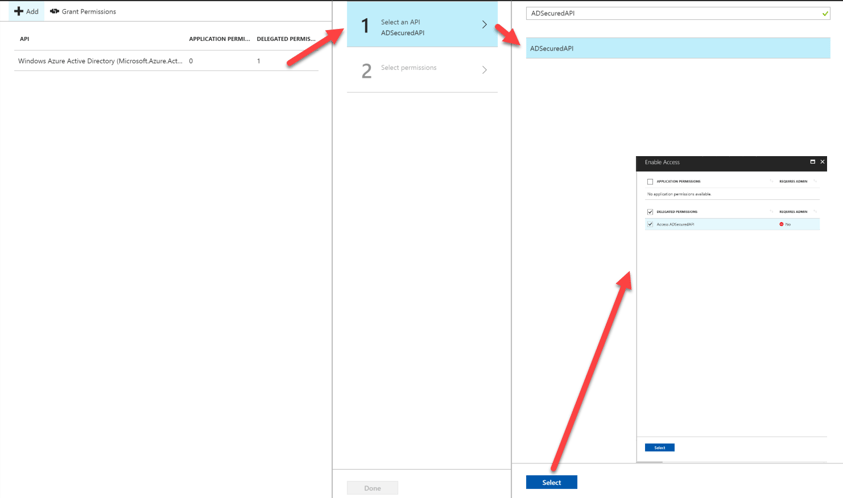
Once we have given our Office365 environment access to the WebAPI, we now need to select "Grant Permissions". This is similar to how you would usually get an alert when installing an Add-In in SharePoint that says you "trust this application to grab information from x,y,z".
Enable OAuth2 implicant grant for Office365
By default, registered applications in Azure AD are not enabled to use OAuth2 implicant grant flow. In order to do this, all we have to do is modify the application manifest and set "oauth2AllowImplicitFlow" to true. In your application web page (the one you see after selecting your app registration), at the top you'll see a button with a pencil that says manifest. Select it and click edit.
change the following value on line17 from false to true
![]()
That's it! Technically speaking, we should be able to use ADAL.js to get an Auth token from Azure and call against our API, but there is one more thing we need to configure. In order to execute calls from Office365 to our on-premise WebAPI, we need to enable CORS.
Enable CORS
To enable CORS, install the WebAPI CORS package from nuget.

Open up your WebApiConfig.cs file add the following line

Lastly we need to decorate our controllers or actions by using the CORS attribute. Open up your ValuesController and add the CORS attribute and specify the origin to recieve requests from (your SharePoint URL).

Setup your SharePoint Page
In this tutorial I am just going to set up a SharePoint page and add a content editor webpart to it. The content editor webpart is going to be the clientside code that utilizes ADAL.js and JQueryto securely execute a request against my WebAPI.
Four values you must change:
- tenant: This is the Identifier of my Azure AD Domain.
- clientId: This is the ClientID of my Intranet Application we registered in Azure AD
- webAPIUri: The URL to my WebAPI, currently my local host
- meUri: This is the URL to my api call /api/values which points to my webAPIUri
  "use strict";
  var adalTest = window.adalTest || {};
  adalTest.clientId = '';
  adalTest.tenant = '';

  adalTest.config = {
      tenant: adalTest.tenant,
      clientId: adalTest.clientId,
      endpoints: {
         webAPIUri: 'https://localhost:59564/' //WebAPI url, currently localhost from Visual Studio
      },
      cacheLocation: "localStorage"
  };
  //Create the autentication context
  adalTest.authContext =  new AuthenticationContext(adalTest.config);

  adalTest.getAuthToken = function(endpoint){
      var d = jQuery.Deferred();

      //Read the token from the cache
      var tokenCache = adalTest.authContext.getCachedToken(endpoint);

      if(tokenCache == undefined) {
          //If token is undefined, then call AAD to get a new token
          adalTest.authContext.acquireToken(endpoint, function (error, token) {
              if (error || !token) {
                  d.reject(error);
              }
              else {
                  d.resolve(token);
              }
          });
      }else{
          d.resolve(tokenCache);
      }
      //Return a promise for acquiring token
      return d.promise();
  };

  adalTest.getAPIData = function(){
      //Get the token, either from the cache or from the server
      var tokenPromise = adalTest.getAuthToken(adalTest.config.endpoints.webAPIUri);
      tokenPromise.then(function(token){
          //Promise for token resolved
          if(token != undefined) {
              //Valid token, make a REST call to the CustomAPI
              var meUri = "https://localhost:59564/api/values";
              $.ajax
              ({
                  type: "GET",
                  url: meUri,
                  headers: {
                      //Include the token
                      "Authorization": "Bearer " + token
                  }
              }).done(function (response) {
                 debugger;
    		console.log('hey!');
              }).fail(function () {
                  $("#message").text("Failed to get the data.");
              });
          }
      }, function(error){console.log(JSON.stringify(error));});
  };

  $(document).ready(function() {
      // Check For & Handle Redirect From AAD After Login or Acquiring Token
      var isCallback = adalTest.authContext.isCallback(window.location.hash);

      if (isCallback && !adalTest.authContext.getLoginError()) {
          adalTest.authContext.handleWindowCallback(window.location.hash);
      }else{
          var user = adalTest.authContext.getCachedUser();
          if (!user) {
              //Log in user
              adalTest.authContext.login();
          }else{
              adalTest.getAPIData();
          }
      }

  });
Assuming everything is set up correctly, the last thing I need to do is specify the Reply URL for this code to successfully retrieve an AuthToken back from Azure AD. Log into Azure AD and open up your Intranet Application and click reply URLs.
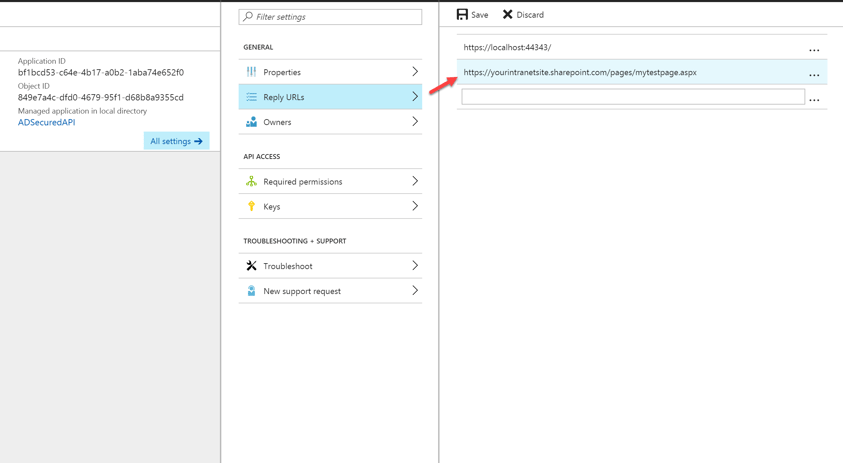
By registering the reply url, we are telling Azure AD where to redirect us after successfully authenticating us from SharePoint. In my case, I have a page called mytestpage.aspx which is where the ADAL.js code above is running.
Thats it! We now are able to make a client side call from SharePoint securely to an on-premise WebAPI, using that JavaScript code above.
I hope you found this post helpful! Azure AD gives us a bit more flexibility to bring on-premise content into Office 365. We can now build fully responsive webparts without having to deal with the Iframes that come with Provider-Hosted Add-ins.
References:
Share