Power Apps is an incredible tool allowing you to rapidly build low-code apps quickly and easily. In this demo, I will show you how to build an equipment tracking solution with SharePoint lists as a data source and a Power App user interface for ease of use on mobile devices.
The Goal of the Solution:
The goal of this solution is to build a way for our client to manage their equipment from both the office (Office Worker Role) and out in the field (Frontline Worker Role). Management of equipment means having lists of equipment and associated maintenance records and maintenance alerts for the office worker and frontline employee. Employees need to be able to be out in the field and able to submit a maintenance record or alert that will update in the SharePoint lists instantaneously.
See how the app works in this video.
SharePoint + Power Apps
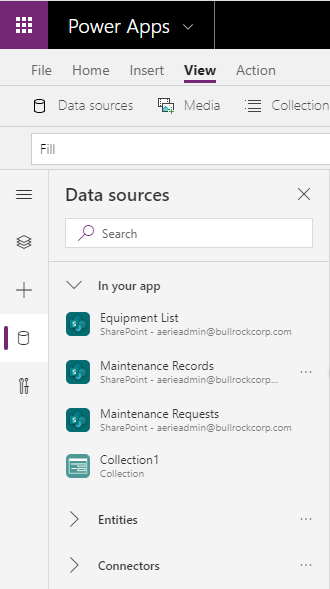
The data source for our application is SharePoint, specifically SharePoint lists. SharePoint lists are an excellent way to manage data and collaboration. With endless customizations, users can tailor the management of their information with ease. If our client had higher data storage requirements, we could easily use a different data source like Azure SQL, but SharePoint fits perfectly for our needs. For this solution we need three lists:
- Equipment list, which contains details such as type of vehicle, location, year, manufacturer, and more.
- Scheduled Maintenance, which provides records of oil changes, tire pressure, light checks, and more.
- Maintenance Alerts, which provides records of broken items that needed attention outside of regular scheduled maintenance (think: broken taillight, flat tire).
With these three lists customized and tailored for with all necessary fields, we are ready to build our Power App.
Are you interested in our Aerie Equipment Tracker? Install it on your site now.

Building the Power App: Aerie's Building Blocks
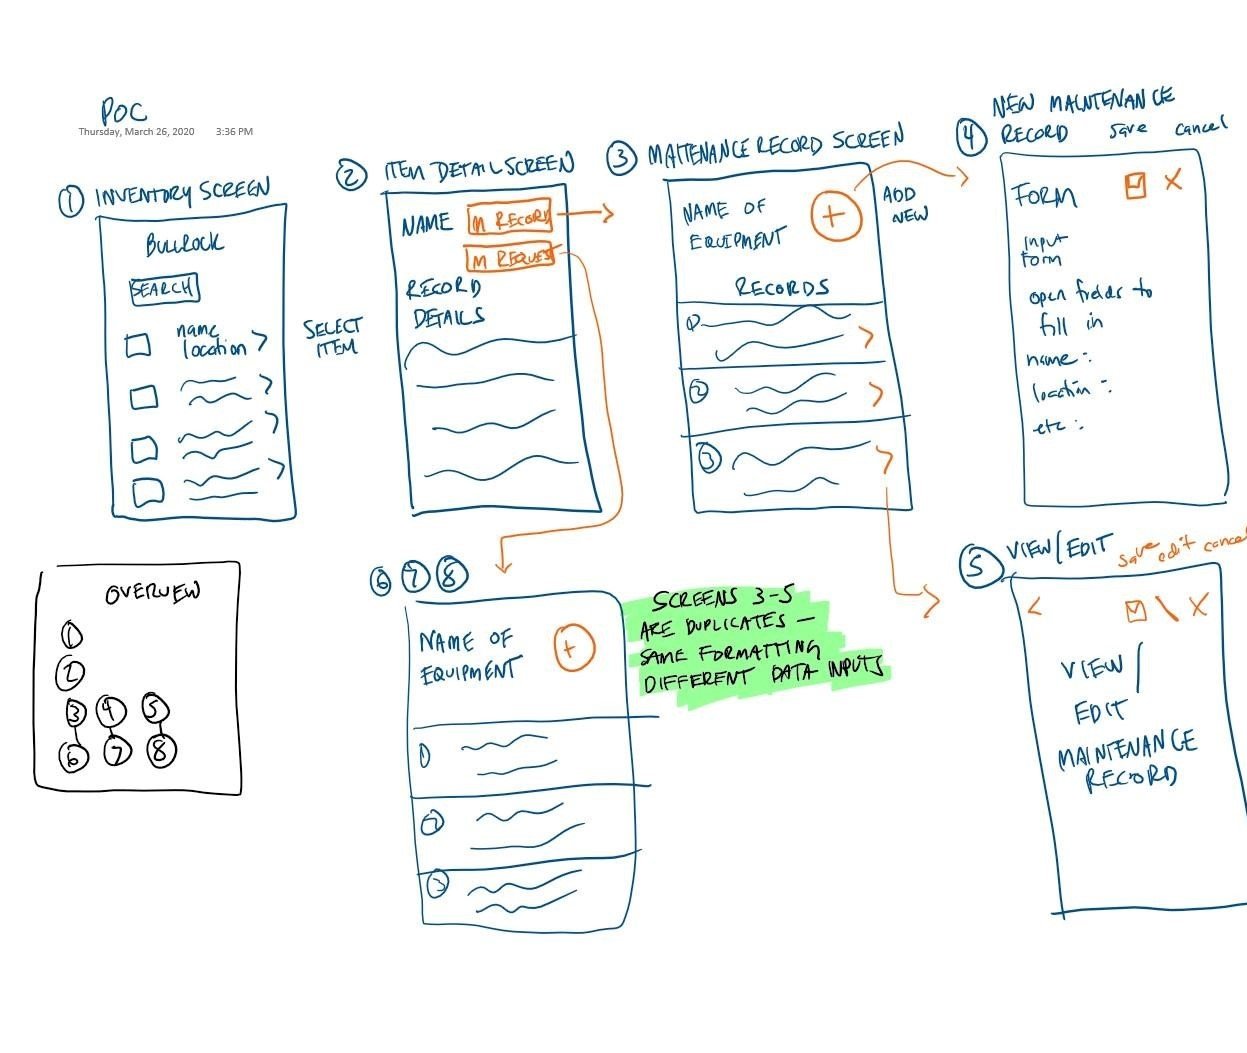
Planning:
I suggest drawing out a prototype of how you would like your app to look and flow from screen to screen. I drew out a wire-frame for this purpose. It’s not pretty, but it was an excellent reference. Keep in mind, this is after having an in-depth conversation about what the app’s prospective users required for this to work for them.
Connect your data:
The Power App is a Canvas App connected to our SharePoint lists. To connect our data to our app, we click Data Sources on the site and hit connectors. We then choose SharePoint and choose our particular site and lists. They will then show up as available for us to use.
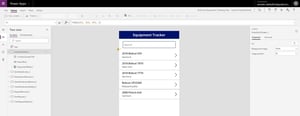
Screens
Using our wire-frame as a reference, we start building out the screens.
Screen 1: Equipment list with search box
On this screen: Vertical Gallery and Text Input
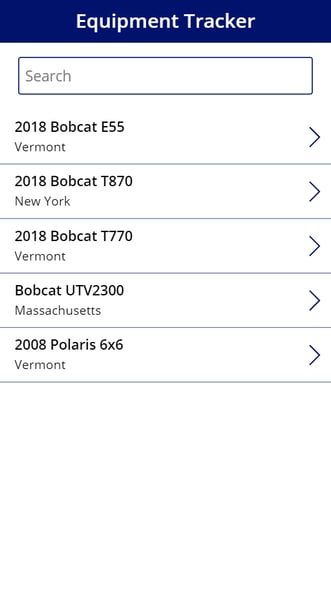
The vertical gallery is set up to show the Equipment List from SharePoint. The user can select which SP columns they want to display for each item.
The text input item is a search box. We made it so that you can search by the name of the equipment only, not any other field. To do so, we went back to the vertical gallery, selected Items and put in this logic:
Items = Filter(‘Equipment List’, SearchBox1.Text in Equipment)
This ensures that this gallery will filter by whichever text is put in the search box that corresponds to text in the Equipment (Equipment title) column.
Screen 2: Equipment Information
On this screen: Buttons and Edit Form
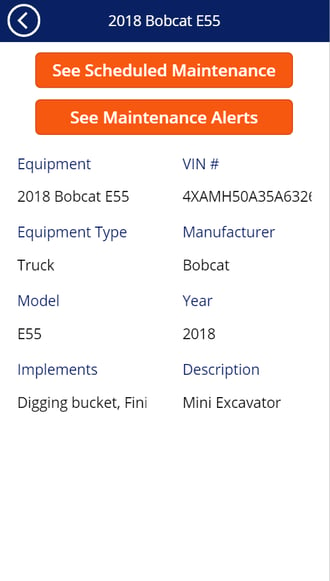
This screen shows the information from the Equipment list of the item selected on the previous screen. To do this, we select the Edit Form and make sure the Item it’s displaying is just that, so we put in:
Item = EquipmentGallery1.Selected
For our buttons, we want to navigate to two other data sources, one for Scheduled Maintenance and one for Maintenance Alerts. These commands are pretty basic:
OnSelect = Navigate(MaintenanceRecords3) and OnSelect = Navigate(RequestRecords_6)
The words in the parentheses are the names of the screens I’m navigating to. In this example, I will navigate to screen 3.
Screen 3: Scheduled Maintenance Records Screen
On this screen: Vertical Gallery and Button
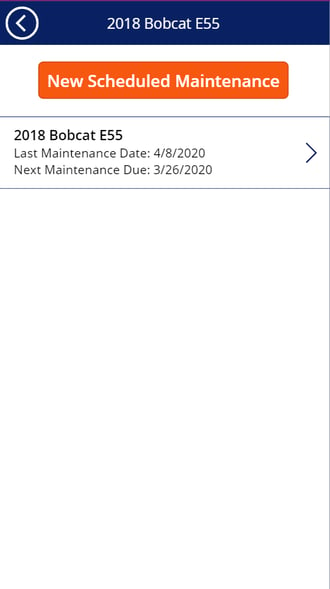
This screen allows you to see all the scheduled maintenance records for this chosen piece of equipment. Like screen 1, there is a vertical gallery this time displaying information from the Scheduled Maintenance SP list. A user can click on each item on the list and see the details of that record. The user can also create a new record on the go, by clicking the New Scheduled Maintenance button. This will navigate the user to Screen 4.
Screen 4: New Scheduled Maintenance Record
On this screen: Edit form, save and cancel buttons

This screen opens up to all the fields that would be columns in the SharePoint list, except they are empty fields ready for the user to add their information. To make a form open this way, make sure you have the form set as:
DefaultMode = FormMode.Edit
The user inputs all of the proper information and wants to save the form. We add a save icon and make a formula for the selection of that button.
OnSelect = SubmitForm(NewMaintRecordForm) & ViewForm(NewMaintRecordForm)
To finish this save operation so that we can see what we just put in the form after we saved, we click back on the form and update the OnSuccess action. This means that on a successful operation, we will see the newly updated information.
OnSuccess = ViewForm(NewMaintRecordForm)
Item = LookUp('Maintenance Records',ID=NewMaintRecordForm.LastSubmit.ID)
This last one will grab the last submitted maintenance record and let us view it.
We also have an X, which is our cancel button. If a user puts in information but changes their minds, they can opt-out of the operation.
OnSelect=ResetForm(NewMaintRecordForm); Back()
ResetForm will remove any information added and the back() take the user back to screen 3.
Screen 5: View Scheduled Maintenance Record Details
On this screen: Edit Form
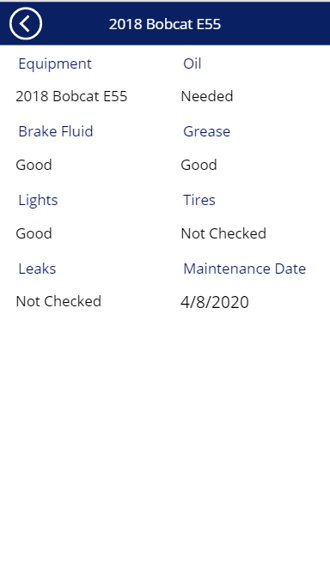
This screen is if you had selected a maintenance record from screen 3. This is a simple edit form displaying the previously selected item.
Screens 6, 7, and 8 are exact replicas of 3, 4, and 5, except they are working with data from the Maintenance Alerts SharePoint list.
Another note: I used edit forms for displaying all information, even if it looked like there was no way to edit the form. This is because, in earlier renditions of the app, a user would have been able to edit an existing Equipment, Maintenance, or Alert record. However, we decided we wanted the app to remain as simple as possible and only for the creation of records on the move. We didn’t want to give all users the ability to edit existing records. We make the DefaultMode = FormMode.View for all forms we want to open in the standard display view without any fields where users can input their own information.
Final Steps
When I was finished, I published my app and played around with it as a user, navigating from screen to screen and testing inputting information, and seeing it update in the SharePoint lists. We created a formal test plan and had numerous users go through all expected behaviors of the application. I also downloaded the Power Apps mobile app to test the user experience on my phone, which was very cool to see.
That wraps up how to build an inventory/equipment tracking application in Power Apps.
Please reach out with any questions or comments! Better yet, install our app today!
