%20(1).jpg?width=300&name=AdobeStock_441268169%20(1)%20(1).jpg)
Have you ever stood up a SharePoint site, created multiple document libraries, and realized afterwards you need to make the same change to each document library? A simple change – such as adding a column to a view – can take hours, but by using PowerShell and the PnP Cmdlets, you can reduce this time to seconds.
In this post, we will create a basic PowerShell script to interact with your SharePoint site and go over best practices to make our script easy to use and edit.
The Situation
To store internal documents for your company, you created a SharePoint site. HR, Engineering, IT, Finance, Sales, Marketing, and Support need their own place to store documents, so each get their own document library. Even though they have their own document library, each department must adhere to the same document tracking policy, so you set up each document library the exact same.
Two weeks later, the document tracking policy is updated to include a new content type of “Company Document” to replace the default “Document”. You create the new “Company Document” content type in the content type hub, but need to add it to the site and update each document library to:
- Allow Content Type Management
- Add the new “Company Document” content type
- Set “Company Document” as the default content type
- Hide the old “Document” content type
- Add the column Content Type to the default view
Doing this manually not only takes a lot of time but is also error prone. Let’s investigate how to automate this with a PowerShell script.
PowerShell and PnP Cmdlets Reference
If you are not familiar with PowerShell or the PnP Cmdlets, review the following documentation:
- PowerShell: https://learn.microsoft.com/en-us/training/modules/introduction-to-powershell/
- PnP Cmdlets: https://pnp.github.io/powershell/cmdlets/
System Prerequisites
Your system must have PowerShell and the PnP Cmdlets installed. If they are not, use the following guides:
- PowerShell Installation: https://learn.microsoft.com/en-us/powershell/scripting/install/installing-powershell-on-windows?view=powershell-7.4
- PnP Cmdlets Installation: https://pnp.github.io/powershell/articles/installation.html
Verify that the PnP Cmdlets have been installed successfully before going any further. To do this, run the following commands in PowerShell and enter your credentials on the screen that pops up:

You should see output reflecting your document libraries, plus some other system lists.
Script Main Flow
Before we start scripting, let’s establish the actions we need to perform:
- Create the script file
- Set the script error preferences
- Create a connection to our SharePoint site
- Add the content type “Company Document” to our site
- Get all the document libraries to modify and exclude others
- For each document library we found:
- Add the new “Company Document” content type
- Set “Company Document” as the default content type
- Hide the old “Document” content type
- Add the column Content Type to the default view
Create the Script File
Create a new text file named UpdateDocLibraries.ps1 on our machine. Notepad, Notepad++, and Visual Studio are all good text editors to use.
Set the Script Error Preferences
By default, if any of the PnP commands fail the script will not exit. We can change that to make the script exit on failure:
![]()
Create a Connection to Our SharePoint Site
The first PnP command to run is to create the connection to our SharePoint site. There are a couple different ways to run this command, so check the documentation to see what works for you. For example, we can hard-code our user and password in the script (not recommended), and two different ways to log in interactively. We will use the popup interactivity:

Add the Content Type “Company Document” to Our Site
Prior to performing this step, we need to get the ID of the content type from the SharePoint GUI. Open the Site Content Types page, select the new content type "Company Document", and examine the URL you are taken to. The field after "ctype=" is the content type id (e.g. "ctype=<content type id>")."
Next, we will add the “Company Document” content type to the site. This will ensure each document library has access to it. Note that we are actually running three commands: add the content type, get the newly added content type, get the name of the newly added content type. We do this because we will use the name later in our script:

Get the Document Libraries to Modify
The previous step acted on the site as a whole; the rest of the steps need to be performed on each individual document library in the site. This step retrieves all the document libraries we need to act on:
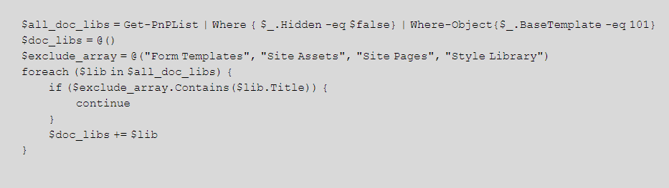
Notes: By default, “Get-PnPList” returns all lists and document libraries, including a few that we don’t need. The pipes “|” in the command filter the object returned, first to omit hidden lists (used by the system), and second to only return document libraries (BaseTemplate 101 is a document library). The foreach loop filters the document libraries further by omitting common system document libraries.
The remaining steps will be inside a foreach loop, iterating over all documents:
Allow Content Type Management
Before adding the content type, we need to allow content type management:
![]()
Add the Content Type and Set the Default Content Type
Next, we add the content type to the library and set it as default:

Hide the Old Content Type “Document”
Now that we have added the new content type, we want to hide the old one so that no one selects it:

Add the Column “Document Type” to the “All Documents” View
Now we need to modify the view “All Documents” for the document library to include the field “Document Type”. The command Set-PnPView unfortunately does not allow us to add just a single column. We must get the existing columns, add our “Document Type” column, and exclude duplicates (my testing shows that a column can exist twice, so we can’t just add our column in the case that it already exists in the view):

Note that we are replacing the space in “All Documents” with the sequence “_x0020_” to match the syntax that the Get-PnPView returns.
Putting It All Together
After adding comments and whitespace for readability, here is what the final script looks like:
# Exit on any errors
$ErrorActionPreference = "Stop"

# Connect to our SharePoint site
Connect-PnPOnline -URL <sharepoint site url> -Interactive

# Add the content type to the site, and get the name to add it later
$null = Add-PnPContentTypesFromContentTypeHub -ContentTypes <content type id>
$content_type_obj = Get-PnPcontentType -Identity <content type id>
$content_type_to_add_name = $content_type_obj.Name

# Print the content type name
Write-Output "Content type name to add:  $content_type_to_add_name"

# Get all the document libraries that are not hidden system libraries
$all_doc_libs = Get-PnPList | Where { $_.Hidden -eq $false} | Where-Object{$_.BaseTemplate -eq 101}

# Exclude common system document libraries
$doc_libs = @()
$exclude_array = @("Form Templates", "Site Assets", "Site Pages", "Style Library")
foreach ($lib in $all_doc_libs) {
    if ($exclude_array.Contains($lib.Title)) {
        continue
    }
    $doc_libs += $lib
}

# For each library that we want to modify
foreach ($lib in $doc_libs) {
	Write-Output "Modifying library " $lib.Title
    # Enable content type management, add the content type, and set as default
    $null = Set-PnPList -Identity $lib.Id -EnablecontentTypes $True
    $null = Add-PnPcontentTypeToList -List $lib.Title -contentType $content_type_to_add_name
    $null = Set-PnPDefaultContentTypeToList -List $lib.Title -contentType $content_type_to_add_name

    # Hide the "Document" content type so users can't choose it
    $content_type = Get-PnPContentType -Identity "Document" -List $lib.Title
    $content_type.Hidden = $True
    $content_type.Update($False)

    # Add the column "Document Type" in our default view
    $existing_view = Get-PnpView -List $lib.Title -Identity 'All Documents'
	Write-Host $existing_view.ViewFields
    $lib_cols_to_add = $existing_view.ViewFields + 'Document_x0020_Type' | Select-Object -Unique
    $null = Set-PnPView -List $lib.Title -Identity 'All Documents' -Fields $lib_cols_to_add
}
Thank you for joining us on this journey! Intrigued by SharePoint and eager to dive deeper? Connect with a specialist today and unlock more secrets.

Share