Adding a signature field to a SharePoint list is a great way to verify user input to a list especially in environments with shared-access kiosks or devices. They are especially useful for tablets. Once the framework is in place they are relatively easy to implement on list or library forms.

The method we will use requires adding several files to your site collection JavaScript library and CSS library.
Start with a SharePoint list that has a Column called “Signature”.
Use the following settings.
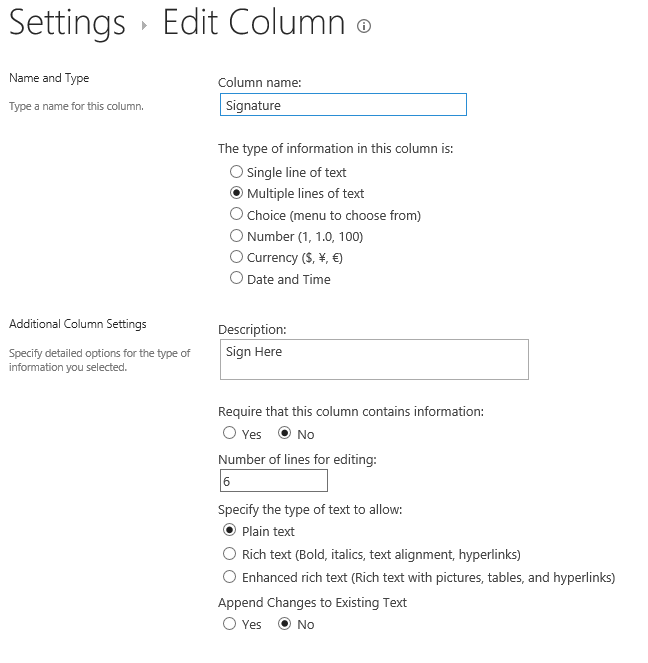
Add a column called “Name”. The user can type their name here.
Now we will add the signature functionality.
You will need
-
jQuery - available here
-
jQuery UI – available here
-
excanvas – available here (needed for older versions of IE)
-
jquery.ui.touch-punch.min.js – available here (this provides support for touch devices)
-
jquery.signature.min.js – available here (a jQuery UI plugin that provides the signature functionality)
Along with these files create a new file in your site collection JavaScript library named “jquery.signature.js”
Add the following code [UPDATED 12/13/17]:
(function () {
   var signatureFieldContext = {};
   signatureFieldContext.OnPreRender = signatureFieldOnPreRender;
                  SPClientTemplates.TemplateManager.RegisterTemplateOverrides(signatureFieldContext);
})();
// This function provides the rendering logic
function signatureFieldOnPreRender(ctx) {
       var _signatureField = $('textarea[title="Signature"]');
       _signatureField.hide();
       var result =""
       result += '<div id="signature-field"></div>';
       result += '<div id="signature-toolbar">';
       result += '<input type="button" value="Clear" id="signature-button-clear"/>';
       result += '</div>';
       _signatureField.before(result)
       $('#signature-field').signature({guideline: true,syncField:_signatureField});
       $('#signature-button-clear').click(function() {
             $('#signature-field').signature('clear');
       });

       // EDIT: SharePoint does not allow mime type "text/css" in js link. We will apply styles directly

       $('.kbw-signature').css({'display': 'inline-block','border':'1px solid #a0a0a0','-ms-touch-action':'none'})
       $('#signature-toolbar').css({'position':'relative'})
       $('#signature-button-clear').css({'position':'absolute', 'top':'-40px','left':'310px'})
       $('#signature-field').css({'height':'120px', 'width':'400px','left':'310px','border':'1px solid #000'})
       $('#signature-data').css({'display':'none'})


}
Open the “New” form. It will be much easier if it is not in a dialog. Put the page into edit mode (available in the settings “gear” menu) and edit the Form web part. Add the following text(all one line) to the JS Link field and make sure the “CSR Render Mode” is set to “Standard”.
[UPDATED 12/13/17]
~sitecollection/path-to-your-js-library/jquery-1.11.1.min.js| ~sitecollection/path-to-your-js-library/jquery-ui-1.10.3.custom.min.js| ~sitecollection/path-to-your-js-library/excanvas.js| ~sitecollection/path-to-your-js-library/jquery.ui.touch-punch.min.js| ~sitecollection/path-to-your-js-library/display.signature.min.js| ~sitecollection/path-to-your-js-library/jquery.signature.js
Click”OK” and save the page.
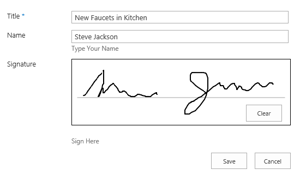
You should see